Even though the onus is on the BUCHI Applications team to crunch the numbers and create the mathematical models behind the BUCHI pre-calibration licenses, there are some key activities that need to happen on the customer end, sometimes in collaboration with BUCHI Applications, and sometimes in collaboration with BUCHI Service. These topics are: preparing and qualifying hardware, sample planning and pre-calibration use, how to decide when calibration update is needed, sample planning for calibration update and data handling. I will provide some more details on each of these topics in today’s post.
Preparing & qualifying hardware
Sometimes when we skip over what we think is obvious, that can become the biggest obstacle to our success. So, let’s start with what may seem obvious. Before you begin any data collection, whether using pre-calibrated applications or not, you should be able to confirm that (1) the spectrometer (NIRMaster or N-500) installation is in a relatively stable environment and the spectrometer is warmed up prior to data collection. A spectrometer should not be installed by a window or HVAC, where direct sunlight or the air flow will constantly change the instrument temperature; (2) the measurement cell (i.e. the top of the NIRMaster or the front end of the N-500) should be clean of debris. All optical pathways (read: glass) should be unobstructed. This includes obstruction by an improperly placed measurement cell add-on; (3) the spectrometer should pass the System Suitability Test, and (4) external references, where applicable, should be clean and in good condition (i.e. no cracks, abrasions or staining).
Should you need to clean any of the optical components, please take care to avoid any abrasive materials. Optical cloth and lint-free optical tissue paper are recommended. You may clean with water, then isopropyl alcohol, or alcohol only. Take care that all residual solvent has evaporated prior to any data collection.
Internal & external references
Internal and external references are a critical part of data collection. The detector inside the spectrometer is not measuring absorbance or reflectance or transmission directly. It’s measuring how many photons of light are hitting it after the light has a chance to interact with your sample. In order to get the spectrum that you see pop up on a screen, we have to divide the signal produced by your sample by a reference material. For diffuse reflectance measurements, that reference material is either a highly reflecting material, like the white Spectralon or gold. For transflectance measurements, the reference material is a diffusely scattering stainless steel adapter or cover. For transmission measurements, the reference is simply air. When your sample scan is divided by a reference scan, you are normalizing your data to compensate for things like aging NIR light sources, variations in ambient conditions. Taking good references will improve the stability of your spectrometer performance and avoid so-called spectral drift.
There are 2 types of references: external and internal. The applicability of these references depends on the measurement cell and add-on being used for your NIR measurements, so don’t be concerned if you open an application and see one type is disabled!
An external reference is positioned in exactly the same place as your sample, so the path of the light is exactly matched. That is the best type of reference because it will compensate for all of the changes in your measurement system except for those produced by your sample itself. However, external references may be impractical in certain installations. Internal references are more convenient because there is no user interaction. The internal reference is applicable for only 3 types of installation: the solids measurement cell with petri dish add-on, the NIRMaster, and the fiber optic measurement cells. An internal reference can be used at shorter intervals without negatively impacting workflow while still accounting for short-term changes to the environment of data acquisition.
So, what happens if you get a warning that the external reference spectrum deviates by more than 5% from the last accepted reference? You’ll see that the pop-up window (screenshot below) gives you some possible reasons, as well as a plot of the last valid (green) and newly collected (red) external reference spectra.

The possible reasons for the deviation are listed in the green sidebar: (1) instrument maintenance was done recently. Obviously, if the lamp was changed or the spectrometer went other service, we can expect to see the light output increase. In that situation, our new reference should have higher intensity values relative to the last valid reference. (2) The Optical pathway is dirty or blocked. In this situation, you might see that you accidentally left your sample container on the instrument instead of collecting the reference spectra. That’s a pretty common scenario, especially before your morning or afternoon cup of coffee. Other possibilities are that you have a dirty window under the sample cup, or maybe you just cleaned the optical path but left residual solvent on the window, and that solvent is absorbing NIR light, causing the deviation. The third possible reason is that the instrument temperature hasn’t reached its working level yet, and another reason not to install the spectrometer outside in December.
The workflow shown below may help you navigate the possibilities. Start in the upper right corner and work your way through, answering yes or no to each question. If you’ve gone through the list and everything is YES, then accept that new reference with confidence. If you have some “no’s” and the deviation persists, consider contacting a BUCHI Service person.

System Suitability Test (SST)
System Suitability Tests, or SSTs, are another safeguard, something that should prohibit you from moving forward when there is a problem with your system. The SST essentially makes sure that the instrument is performing to manufacturer’s specifications. These specifications were constructed around analytical verification and qualification tests used by the pharmaceutical industry. Typically, your application is set up to perform an SST once a day when the instrument is in use. So, what happens when that test fails?
First, take a look at the component of the test that failed. This is clearly indicated in the SST report. If the noise test failed, first try cleaning the optics and replacing the lamp.If the temperature test failed, check that your instrument is warmed up. If the temperature exceeded tolerance, look for an alternate location outside of the active volcano your lab is located in. If that doesn’t apply, check the airflow to the filters and see if filters need replaced. If the photometric linearity or wavenumber accuracy test failed, or if the noise or temperature issues can’t be rectified, submit the SST and NADIA to your local BUCHI Service Engineer.
It is important that data are not collected unless the SST has passed, as measurements may be inaccurate.
Sample planning
The next important task for pre-calibration users is to consider sample planning. First of all, what types of samples are applicable to the pre-calibration? You can see some of this information in our application brochures, where we publish calibration property ranges, as well as sample compatibility. If you’re already using a pre-calibrated application to generate measurement results, the range will also be in the table at the bottom of the default reports, as well as in the Application settings accessible via NIRWare Management Console.
If your samples fall outside of the property range (i.e. higher or lower than the published values), or if your sample is incompatible (read: not considered in the calibration data set yet), then you will need to team up with a BUCHI Application Specialist to have the calibration extended with your unique samples.
Calibration update
If you are using a pre-calibration, it may be that at some point you find yourself with samples that aren’t exactly well-described by the calibration samples. How do you know when to initiate calibration update?
There are 3 main observations indicated that calibration update may be needed: 1) a slope and/or bias is observed relative to the reference lab testing; 2) samples are falling outside of the calibration property range; (3) the sample spectrum residual exceeds the calibration limit. Let’s take a closer look into these three scenarios.
Case 1: Slope/Bias
Spot checking with a reference laboratory method an offset between NIR and Lab results. In the figure below, the blue symbols are the measurement results and the solid black diagonal line shows where the points would fall if there was 100% agreement between NIR and laboratory (reference) data. In this case, the bias, or difference between the reference and predicted values, is greater at lower concentrations, indicating a slope correction may also need applied.

Why does this happen?
There could be systematic differences in the samples being measured, whether something like sample preparation or particle size that wasn’t accounted for by the calibration model. A simple solution to this problem is to apply a slope and/or bias correction to the NIR measurements.
This is the strategy. 1) Collect spectra of samples and then gather the reference laboratory data for those samples; 2) determine the slope and bias; 3) implement the corrections within the NIRWare application; 4) evaluation the updated application performance.
When you are collecting spectra and reference data, be sure to span the full range of the calibration. Ideally, collect 10 or more samples spaced evenly across the calibration range. In order to calculate the needed slope or bias correction, create an Excel spreadsheet with NIR and LAB data in adjacent columns. The bias is the average difference between the columns. The slope can be calculated using the Excel function “Slope”.
Once the slope and bias corrects are calculated, enter their values in the NIRWare Application, as shown below. Now, the corrections will automatically be applied when you collect your sample measurements.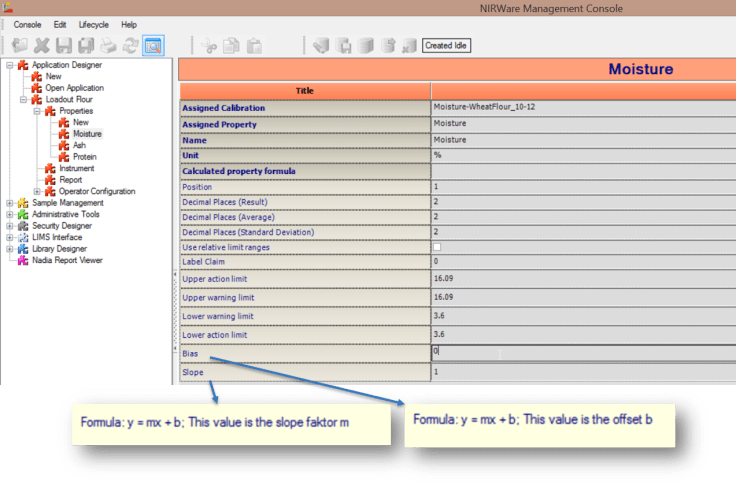
Property range outlier
In our second case, we have a property or range outlier. Here, the measured sample falls outside of the range of property values spanned by the calibration data set. The Operator will see these sample measurements in a red box on the Operator screen. What do you do? Our suggestion is to send the sample or samples out for reference testing, then submit the sample spectra with reference values to the BUCHI Group. We can recalculate the calibration model to accommodate the new range.
Spectral residual outlier
In the 3rd case, you have a spectral outlier, or spectral residual outlier. In essence, the sample you’ve just collected does not match the characteristics (i.e. peaks, or lack thereof) of the calibration spectra. There is left-over, or residual, character to the sample spectra. The Operator sees a red X and no measurement value on the Operator screen. Here, first check that the sample was positioned properly and that the last reference measurement was good. If both check out, then send that sample off for reference testing and submit those results to BUCHI for calibration update.
Sample planning for calibration update
Contact a BUCHI Application Specialist to discuss more frequent observations of property or spectral outliers, as well as upcoming formulation changes are expected to result in unique samples relative to the existing pre-calibration.
When you are planning to collect NIR spectra and reference laboratory values for calibration update, make sure to span as many of the product variations expected in routine measurement as you can. These may include:
- Sample composition (incl. degree of sample uniformity, raw material sourcing)
- Sample temperature (e.g. frozen, warming, hot, cooling)
- Particle size (e.g. product streams from older vs newer milling equipment)
- Sample packing, preparation (i.e. between-operator variability)
- Residual moisture from processing or environmental conditions
One of the keys to getting an optimal calibration (low error, good precision) is making sure that the samples collected on the NIR match the samples sent for laboratory testing. Because NIR is non-destructive, the same sample can (and should) be used for both methods. Also keep the sample’s stability and uniformity in mind. If the sample is oily or hygroscopic or prone to particle segregation, give it a stir before collecting spectra or pulling off your sample for the reference test.
Collaboration with BUCHI
The BUCHI Pre-calibrations are a great way to jump-start your NIR program! Be sure to take advantage of our calibration update program to get the best possible method performance for your installation. For additional support or information on available pre-calibration products, please contact us!
